OT Draw Licensing System Update
Coming 1 October 2025
You’ve probably heard – we’re making some important changes to how you access and manage your OT Draw licence.
From 1 October 2025, all purchases and renewals will move to a new email-based login system, replacing LicenseIDs. This change gives you more control, greater flexibility and a simpler and more secure experience.
What’s Changing?
- You’ll log in using your email address instead of a LicenseID
- Renewals and new purchases will be completed through the new Buy page on our website (live from 1 October)
- The old SoftwareKey portal will be retired — you’ll no longer manage your licence through that system
- You’ll need to download and install the latest version of OT Draw to use the new login system
- Licences are now subscription-based only (no more perpetual licences will be available)
- You will be able to choose from Monthly, Annual or Multi-year (up to 3 years) options
- Auto-renewal is available and can be turned on or off in your portal
- You can pay directly with a credit card — no PayPal required
- Each user will be able to log in on up to two devices
- Multi-factor authentication (MFA) will be available to all users for added security
How to Purchase or Renew OT Draw (from 1 October)
If you’re looking to purchase or renew your OT Draw subscription, you’ll do so via the Buy page on our website, launching on 1 October 2025.
Here’s how it works:
1. Choose your product (i.e. OT Draw)
2. Select your licence type:
- Individual licence (for one user)
- Team licence (for two or more users)
To purchase multiple licences for your team:
1. Choose the team licence
2. Select how many users you need
3. Enter the email address of the person who will manage the subscription
- This person will receive invoices and renewal reminders
- They’ll be able to log in, update account details, add and assign users
- This person will be known as the “billing admin” in our system. This role can be reassigned later if needed
FURTHER SUPPORT:
For issues and questions about the use of this program please contact us at [email protected]. You can email through any OT Draw projects if you need feedback or assistance.
You can also check out the OT Draw User Manual here.


New Licensing System FAQs
When is the new system launching?
The new licensing system will go live on 1 October 2025.
Will I need to agree to a new licence agreement?
Yes. From 1 October all purchases and renewals come with a new licence agreement. It’s simply an updated version that reflects the switch to subscriptions, email sign-in and new security features. You’ll see and accept it when purchasing and during the installation process.
The new licence agreement can be found here.
Do I need to do anything now?
No — not until your licence expires. You’ll receive a reminder with all the details when it’s
time to renew.
How will I know when my licence is going to expire?
You’ll receive an automated email 30 days before your current licence expires. This will include:
A reminder to renew through the OT Draw Buy page
Instructions for downloading and installing the updated version
After your current licence expires, you’ll no longer be able to access OT Draw until you’ve renewed online and installed the updated version.
Can I create my new account before 1 October?
No — the new Buy page and login system will only be available from 1 October.
Will pricing change with the new system?
Yes — there will be a small price increase from 1 October 2025. This reflects the added flexibility (monthly, annual or multi-year options), enhanced security features (like MFA), and improved account management tools included in the new system.
Is GST included in the price?
Yes — GST is included in all the pricing listed for Australian customers
What is the new licence options?
With the new licensing system, we have aimed to simplify all aspects of the licensing process.
All licenses will be either monthly or annual subscriptions. You can request multi-year subscriptions if that can assist with funding.
As licences are now governed by the number of users, you simply choose between an Individual or a Team Licence (2-9 users).
If you are larger organisation with 10+ users, please contact us at [email protected] to discuss volume discounts with an Enterprise Licence.
What is the new pricing schedule?
For Australian users the pricing (including GST) as of 1 October 2025 is:
| user/month | user/year | |
| Individual | AUD 30.00 | AUD 315.00 |
| Team | AUD 25.00 | AUD 255.00 |
For International users the pricing in USD as of 1 October 2025 is:
| user/month | user/year | |
| Individual | USD 19.00 | USD 200.00 |
| Team | USD 16.00 | USD 165.00 |
Do I have to pay by credit card on the website?
No — while credit card payment is the fastest option, we can still issue manual invoices if you prefer to pay that way. Just contact us and we’ll arrange this up for you.
What if I’m managing a team licence?
You’ll buy a team licence through the website, specify user numbers and manage them through your online account. The first person set up is both an Admin User and the Billing Admin by default. This can be reassigned later.
What are the different user types?
We’ve simplified it into four roles:
- Billing Admin – manages payments, renewals and can also manage users
- Admin User – has admin privileges and uses OT Draw
- Admin Only – has admin privileges but doesn’t use OT Draw
- General User – uses OT Draw only (no admin privileges)
You can also nominate a Non-Billing Admin if you want another person to manage users without touching billing details.
Can I add more licences or change billing cycles mid-subscription?
Yes — you can add users, switch from monthly to annual, or adjust your renewal settings at any time.
Simply log in to the portal and go to the Manage Subscription page.
I already have a perpetual licence. Am I affected?
No. Your perpetual licence remains valid. You’ll only need to purchase a subscription if you want to upgrade the software to receive new functionality ore would like the benefits of the new licensing system.
Where do I download the latest version?
Always download from our Download page. You’ll need the latest version to use the new login system.
General FAQs
Can I try before I buy?
Yes absolutely! We encourage you to take advantage of the 14 day trial period to see if OT Draw will meet your needs.
Simply download, install and run the program to start your trial today.
The trial is fully operational and includes all the features available in the program. When you purchase a license you will receive a LicenseID to unlock the trial and get ongoing access.
What platforms is OT Draw available on?
OT Draw is available on Windows and MacOS.
You can use it on Windows tablets that run the full version of Windows but it is not compatible with iPads or Android tablets at this stage.
How often do you release Software Updates?
Our goal for OT Draw is to make it the ultimate program for OT’s and home modification specialists like yourself.
The improvements in the program over the years have come from feedback from our end users.
If you want it, we aim to build it in. Please reach out with any feedback or request. We really value these contributions.
We regularly release minor updates with fixes and enhancements and aim to release a major update with new functionality every 6-12 months.
We have a lot of exciting goals for the program for the years ahead.
What support do you provide?
OT Draw is the ultimate drawing program Please reach out to us at [email protected] or through the contact page on this website for any questions or issues you may be having.
With a background in Occupational Therapy we can provide specialised support to get the most out of the program to best help your clients. Whether it’s providing technical assistance with getting OT Draw installed and running correctly or advice in how to get the most out of the OT Draw features, we are here to help.
The Service Level Agreement (SLA) for OT Draw is listed in the End User License Agreement (EULA) which can be found here.
What training option are available?
We want you to get the most of the program by utilising all the custom-made features.
There are tutorial videos on this website and the user manual can be found here.
Some other helpful resources include a Keyboard Shortcuts cheatsheet and a Tips and Tricks cheatsheet.
The program also has some built-in learning tips to help you. These include an Introductory Wizard, Tutorial Tips and Daily Tips and Tricks.
We can also run individualised training sessions for you and your team, tailoring it to your timeframe, workload and budget.
Please contact us at [email protected] for pricing and for any other training resources.
Who made this thing?
OT Draw is designed and distributed by Insighted Pty Ltd. At Insighted we are passionate about combining Health Services with Technology.
Insighted and OT Draw were started by Mitch Hubbard, an Occupational Therapist from Southern Sydney.
The vision for OT Draw was to create a tailor made computer-aided drawing program specific to exactly what OTs need to draw.
Licensing
Software Updates
All our subscription licenses come with full software maintenance so you can get access to any and all software update features that are released.
Renewing subscription
You can renew your subscription at any point by logging in to your customer portal.
Simply click the Login button on this website and enter your email and password.
Only the ‘Billing Admin’ role will have access to the Billing page where you can Renew your subscription, add or change credit card information and turn Auto-Renewal on or off.
There is no issue with letting your subscription lapse and then renewing the same license when you need access again.
Refund policy
If you’re dissatisfied with the OT Draw license you purchased from www.otdraw.com, you may contact us within 30 days of your purchase to request a refund.
You are eligible for a full refund under the following situations:
– The provided license is unusable
– The program has not been able to be successfully activated
– There are significant issues with the basic functionality of the program
Insighted Pty Ltd will consider but cannot guarantee other refund requests.
Please note, we offer a 14 day trial period to make sure the program can be installed successfully in your environment and to evaluate that the software features meet your requirements.
Delivery
OT Draw is available via electronic download from this website. Please contact [email protected] if you are having issues downloading and installing the OT Draw program.
Other License Options
All licences for OT Draw are subscription licences so that all users are eligible for all software updates.
The monthly subscription terms are monthly or annual. However we can offer multi-year subscription (up to 3 years) on request. Please contact [email protected]
Installation and Activation
Downloading installers
OT Draw is available on Windows and MacOS.
The Windows installer is an msi installer and the MacOS Installer is a zip file.
The download page will automatically detect the correct installer for download.
Installing on Windows
To install the program on a Windows device, download the msi installer from our Download page.
Then run the installer and go through the installation wizard. We recommend installing the program in the ‘C:\Program Files (x86)\Insighted\OT Draw\’ as is defaulted.
Installing via Command Line Arguments
To assist with deployment on Windows machines, it is possible to use command line arguments with the msiexec tool.
After downloading the msi installer you can use the following command line to install and activate the license silently and simultaneously:
msiexec.exe /i “OTDrawInstall.msi” LicenseID=12345678 Password=ABCDEFGH
Installing on MacOS
The installer for MacOS is the same as the Windows installer but it requires .Net Framework 4.6.2 in order to run properly.
Download the MAcOS zip installer for OT Draw and extract the OT Draw.app file.
On first running the program it will prompt to move the program to the Application folder. Click Yes to conform this.
On first run it will also automatically start the downloading and installation of the .Net Framework. This process will take a couple of minutes and with go through a series of installation progress bars.
This process is only required on first installation. When downloading any future updates this additional installation is not required.
Accessing software updates
The program will periodically check if there are any software updates available. With our subscription licenses you are entitled to any and all software updates that are released.
You can manually check for software updates from the License or Help menus of the program.
Drawing Techniques
Drawing Methods
There are 2 main methods for drawing in OT Draw.
Click and Drag Drawing:
Click and hold down the mouse button to start, hold and move the mouse to draw, and release the mouse button to finish.
Click and Click Drawing:
Perform a quick click and release to start drawing, move the mouse to draw, and perform another quick click and release to finish.
Disabling Click and Click Drawing
Some users find that the Click and Click method of drawing can lead to issues and objects being accidentally drawn.
There is an option to turn off this feature so that Click and Drag is the only drawing method available.
This is especially true for users who draw using a trackpad rather than a mouse.
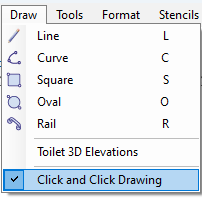
To turn off this feature you can uncheck the Click and Click Drawing option in the Draw menu of the program.
Drawing to Scale
You can draw to scale in OT Draw by entering in values as you draw.
If you are drawing via Click and Drag you need to:
– Click and drag to choose the start point and direction of the object
– While still holding down the left mouse button, press the number keys to enter the distance (for line-based objects) or the width, then a comma, then the height (for 2D objects)
– While still holding down the left mouse button, press Enter to finish
– Let go of the mouse to end the process
If drawing via Click and Click:
– Click and move the mouse to choose the start point and direction of the object
– Press the number keys to enter the distance (for line-based objects) or the width, then a comma, then the height (for 2D objects)
– Press Enter to finish
Setting the Scale of the Diagram
Each canvas in your OT Draw project can have a different Scale Factor.
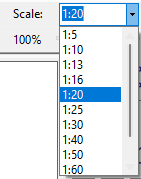
This is set by the Scale parameter in the top right corner.
The scale is set at 1:20 by default. Some modules, namely the Bathroom Templates and Photos modules, change this parameter to ‘Not to Scale’ as they are perspective drawings or images.
Zoom Methods
So that you can zoom in and out of your canvas without changing the scale, there is a Zoom Slider under the Scale Factor parameter in the top right corner.
There are 3 ways to zoom in and out of the canvas.
- Adjust the marker on the zoom slider parameter
- Scroll the mouse wheel up and down
- Use the commands in the Edit menu or the shortcuts Ctrl+ and Ctrl-
Disabling Zoom via Mouse Wheel
Some users may experience issues with the canvas zooming in and out accidently if they have a sensitive mouse control.
This can be especially true for Apple Magic Mice or any mice that have a touch surface on the front for scrolling.
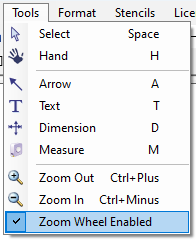
To avoid this issue it is possible to turn off the Zoom functionality via the mouse scroll by unchecking the ‘Mouse Zoom Enabled’ parameter in the Tools menu.
Keyboard use while drawing
There are a number of keys that can be used while drawing to adjust the object. They can be used to modify the object (eg: SHIFT key), toggle parameters (eg: TAB key), manipulate the object (eg: change direction with the Arrow keys) or perform specific tool functionality (eg: create junction points with the Rail Tool).
A full list of all the keyboard shortcuts and their functions can be found here.
Exporting Diagrams
Exporting Options
Once you have created your diagrams in OT Draw they will need to be exported out.
There are 4 options:
Export as an Image:
This will export each diagram as a separate image file (eg: jpg) for you to use in a report, email etc
Transfer to Document:
This will export all your diagrams into a single Word document. There are capabilities to include the client name and details on each page as well. You can also link to a Word Template to customise your report.
This feature is only available for Windows at this stage.
Print from OT Draw:
You can print your diagrams directly from OT Draw if required.
Copy and Paste:
You can simply copy and paste from OT Draw into any other program that accepts image files such as an email, Word document or image editor.
Using a template for Transfer to Document
To help customise your document you can create a Word document template (.dot file) that OT Draw will use to create the transferred document.
There are 2 options for creating a template:
Header and Footer:
In the .dot file you can place any custom information in the header and footer such as organisation logos, contact details, disclaimers etc.
Then OT Draw will use the body of the document to add the client and OT information as well as the diagrams.
<Markers>
This option gives you more ability to customise the template. You can still add any organisation and disclaimers etc in the header and footer but you can also customise the body of the document as well. Simply design your document layout and then wherever you want identifying information you can add a <Marker>.
For example, where you want the client’s name to be place a <Name> marker in the template. OT Draw will then replace this marker with the client’s name during the transfer process.
The full list of available <Markers> is:
<Name> = Client’s full name
<Address> = Client’s full address
<Phone> = Client’s phone number
<Works> = Written description of works
<Title> = Title of the diagram
<OT> = Name of therapist
<Date> = Today’s date
Within OT Draw go the Format Menu > Transfer Settings then click on the CLICK HERE link for further description and example templates.
Why is my diagram no longer to scale after I export it?
OT Draw will draw in the scale you specify with the scale factor.
However during the process of exporting and printing the image can be sometimes be resized to make it fit on the size page you are printing.
If exporting:
The image file (eg: jpeg) has the diagram to scale when it is at 100%.
When you print the image you need to make sure the printer settings are set to print it out at 100%.
If transferring and printing from a Word document:
MS Word will automatically resize your image to make it fit within the formatting of your document. (ie: fit within the margins, orientation etc of the page)
To check if MS Word has resized your image, right-click on the image in Word, select Format Picture or Size and Position and check the size. If the size is no longer at 100% then you will need to reformat your document to make it fit. For example you may need to to change the size of margins, the page orientation, size of header and footers etc. If it still doesn’t fit on the page you will either have to print to a larger page size or go back to OT Draw and change the scale down to make the diagram smaller. If you do go back and make changes in OT Draw you can copy and paste the image from OT Draw back into Word rather than transferring to document again.
If printing straight from OT Draw:
You can adjust the margins, page layout etc in the print preview screen. If the diagram is still oversize there is an option to resize to fit or to retain the size and keep the scale.
Known Issues and Functionality
Not all objects converting from floorplan to side view
If an object from the floorplan is not appearing in the corresponding side view, it may be because the floorplan object is too far away from the wall or has an incorrect direction.
In addition, not all objects will automatically convert to the side view. This is especially true of kitchen objects. For example the stovetop and sink tools do not lend themselves to a side view element.
Some other tools may convert to a 2D elevation side view but no the 3D perspective side view.
Transferring to Document error
There can be connection issues with the Transfer to Document feature. It connects to the Microsoft Word application to automatically create a Word document.
There are a couple of known issues with this process.
1. The most obvious issue is if Microsoft Word is not installed on your device. You will need to purchase a license and install the Microsoft Word application.
2. In some versions of Word, if there is a Word document open or a Word background process running it causes an error. You need to close any open Word documents but also quit any background processes.
3. If a newer version of Word is installed, then removed and an older version installed instead, it can cause an error.
The solution in this case is to repair the Microsoft installation.
To repair, open Control Panel, then Programs and Features, then find Microsoft Office in the list and double click it to repair.
Transfer to Document not appearing in MacOS
The Transfer to Document feature is only available on Windows, not MacOS.
This is due to connection required with Microsoft Word.
We are investigating other options for similar functionality but it is not available at present.
Projects not saving on MacOS
For MacOS users, there is a known issue when trying to save an OT Draw project.
The program will appear to save and no error message appears, but no project file is created.
This issue occurs when any of the folders in the save filepath have a space at the start of end of the folder name. There can be spaces in the middle, just not leading or trailing spaces.
If you rename any folders to remove the leading or trailing space, the project will save correctly.
Diagram very small when exporting
Sometimes the exported diagram can look very small, often set far towards a corner, with a lot of white space towards the opposite corner.
This normally occurs when a small object is accidently drawn and it included in the export.
To resolve the issue you can draw a selection box to try delete the small object or use the Crop Tool to define the restraints of the diagram.
Legacy Licence (pre 1 Oct 2025)
What is a Legacy Licence?
Licences were previously created using a 3rd party system called SoftwareKey. Licence holders were issued with a LicenseID and Activation Password which were used to activate OT Draw on the devices.
This type of licence has been replaced by our improved, custom-based email login system.
The information below is only applicable to users who purchased a licence before 1 October 2025 and have not yet updated to the new licensing system.
What is an Activation?
OT Draw is licensed by the number of devices that will use the program.
Your license will allow you to activate the program on each device.
You will purchase one license for yourself or your team and designate the exact number of activations required.
For example, you can purchase a Team License for 3 activations. This means that you will receive one License that allows you to activate on 3 computer.
How do I activate my copy of the program?
Once you have purchased a license, you will be issued with a LicenseID and Activation Password.
Use the same LicenseID to activate on each device.
Once you have downloaded and installed the program from the website, run the program and click Activate.
Software maintenance
Software maintenance means you are eligible for future software updates.
All our subscription licenses come with full software maintenance so you can get access to any and all software update features that are released.
If you have a perpetual type license then you would have needed to purchase a software maintenance plan on top of the licence fee to be eligible for new functionality.
With the new licensing system superseding these legacy licences, perpetual licences with software maintenance will be honoured for the life of the existing plan, but no additional software maintenance can be purchased
Renewing Legacy subscription
Legacy licences can no longer be renewed via the SoftwareKey portal.
Please contact [email protected] to get assistance moving to the new licensing system or negotiating a renewal of your legacy licence.
Changing the number of activations in your Legacy license
Any changes to your Legacy licence need to be updated manually. Please contact [email protected] for support
Activation Requirements
A standard activation is very straight forward. Once the program has been downloaded and installed, run the program and click Activate. You then enter the LicenseID and Activation Password issued for your license to complete the activation.
Some sites may block this activation process to their internet security protocols.
We use a 3rd party system called SoftwareKey to manage the activation and management of the licenses.
The licensing clients all use the same underlying technology as web browsers for activation. This means only connections on ports 80 (HTTP) and 443 (HTTPS) need to be allowed.
The license server URL is https://secure.softwarekey.com.
Manual Activation
Is the standard activation process is being blocked then there is a manual activation process available. It completes the activation through a secure webpage instead. Simply go through the following steps:
- Run the OT Draw program and click Activate

- Click the word HERE to activate manually

- Enter your LicenseID and Password and click Generate Request

- Click the COPY button
- Click the OPEN ACTIVATION WEB PAGE button

- This will open a webpage in your browser. Paste the Activation Request text into the box provided. You can do this by clicking the PASTE button or clicking in the box and pressing Ctrl+V

- Click the SUBMIT button

- This will open a new webpage with the Activation Response text. Click the COPY button to copy this new text

- Go back to the OT Draw program and click on the PASTE button to paste in the new Activation Response text into the bottom field

- Click the ACTIVATE button to finalise the activation

- You should now be activated. Click the OK button to access the OT Draw program
Viewing Legacy License Details
Once your device has been activated using the LicenseID, you can view these license details through the program.
Select License Details from the License menu of the program. In earlier versions this may be under the Help menu instead.

Refreshing Legacy Licence
The OT Draw program periodically refreshes your license to pull through any changes made to your license. This happens about once a week.
You can also manually refresh your license at any point by selecting Refresh License from the License menu in the program. In earlier versions this Refresh License option is found in License Details in the Help menu.
Transferring Activation to a different device
You are able to transfer your license to another device at any point.
The process is that you need to deactivate your copy on the current computer and then reactivate it on the new one.
There are 2 ways to do this.
1. If you have access to OT Draw on the original computer then you can simply deactivate by going to the License or Help menu within the program and selecting Deactivate License.
Then you will need to download, install and run OT Draw on the new computer and use your LicenseID and Password to reactivate it.
2. If you no longer have access to the OT Draw program on the original device you can deactivate remotely by logging in to your customer portal.
From here you select Manage Installations and deactivate your license.
Then download, install, run and activate OT Draw as above.
No remaining activations
When you try to activate your license you may get a popup advising that there are no remaining activations for your license.
When you are issued with a LicenseID your license is limited to the number of activations that were purchased. For example, if you purchase a Team License for 3 devices, the program will let you activate 3 times with the same LicenseID. On the 4th attempt it will advise that there are no remaining activations.
In this situation you need to deactivate the license from one of the other devices before proceeding.
If one of your old computers has crashed or been replaced, the old activation may still be sitting in the system and needs to be deactivated remotely through the portal.
See answer above for how to deactivate both through the program and through the customer portal.
Accessing your Legacy customer portal
When you purchased a Legacy licence for OT Draw you are issued with 2 sets of information. You are issued with a LicenseID and Activation Password are used to activate your license on the various computers. You are also issued with a CustomerID and Password which are used to access your customer portal to manage your licenses.
Click Here to access the Legacy customer portal
Change Legacy Customer Password
When purchasing your OT Draw Legacy license online you would have created a customer record and set your password as part of that process.
If we processed your payment manually, through a separate invoice, you would have been issued with an automated password.
In either case you can change your Legacy customer password at any point by logging in to your customer portal and selecting Change Password from the Home Page.
If you have forgotten your password, there is a Forgot Password link on the sign in page. It will send an automated email to the contact email on file. If you are having issues accessing the automated email, please contact us at [email protected]
Edit Legacy Licence Contact Information
The contact information was first setup when you purchased your initial OT Draw Legacy license.
You can edit the contact name, email, phone and address at any point by logging in your Legacy customer portal and selecting ‘Edit Contact Information from the Home Page.

Edit Activation names
At the point of activation you are asked to enter an Installation Name to describe the activation. By default it is a combination of the computer name and the current user name.
This Installation Name can be edited at any point through the portal to reflect a more meaningful description.
To do so perform the following steps:
- From the Home Page select Licenses & Activations

- Select the appropriate license from the list. Normally only one license will be listed

- Scroll down and click the Manage Installation button

- This will bring up a full list of all the activations for your license. Click on the yellow Notepad icon to edit the Installation Name

- Click Save to finish

Deactivate Activation remotely
If you no longer have access to the original computer you can deactivate the existing Activation remotely. This will enable you to activate on a new computer if the old activation is still sitting idle in the system.
Perform the following steps to deactivate through the portal.
- From the Home Page select Licenses & Activations
- Select the appropriate license from the list. Normally only one license will be listed
- Scroll down and click the Manage Installation button
- Click on the red cross icon to deactivate that particular Activation

- Click OK to confirm the deactivation
